Warning
OhmPi is a participative project open to all, it requires skills in electronics and to respect the safety rules. OhmPi must be assembled in a professional context and by people competent in electronics. The OhmPi team cannot be held responsible for any material or human damage which would be associated with the use or the assembly of OHMPI. The OhmPi team cannot be held responsible if the equipment does not work after assembly.
Assembling an OhmPi Lite (32 electrodes)
1 Measurement board v2024 + 4 MUX board v2024 + 1 Digital power supply (DPH5005)
Here, we present how to build a 32-electrode OhmPi system using 1 mb.2024, 4 MUX.2024 and 1 DPH5005. This tutorial aims to illustrate one way of assembling a system using the MUX 2024 boards. It provides a working base, with room for improvement. Any idea to improve this design is welcome. Those who wish to build a 16-electrode OhmPi system can neglect steps 8-10, and adjust cable lengths/numbers accordingly.
Warning
In this set-up, the MUX 2024 boards are configured in 2-role mode (see 2-role configuration). This means that each MUX board addresses 2 roles (AB or MN) and 16 electrodes. So one needs at least two MUX boards to be able to make ABMN measurements. Mounting the MUX boards in 2-role mode allows to take advantage of the electrode IDC connectors to connect more easily reference circuits for lab testing. Mounting a system with MUX 2024 boards each set-up in 4-role mode (see 4-role configuration) is also possible but implies cabling the boards differently as to what is illustrated in this tutorial. 4-role mode is mainly designed for 8-electrode systems, or for set up where users are only connecting electrode wires via the screw terminals.
It is also most recommended to having tested each MUX board individually (see Checks) before mounting them together.

|

|

|

|

|

|

|

|

|

|

|

|
Warning
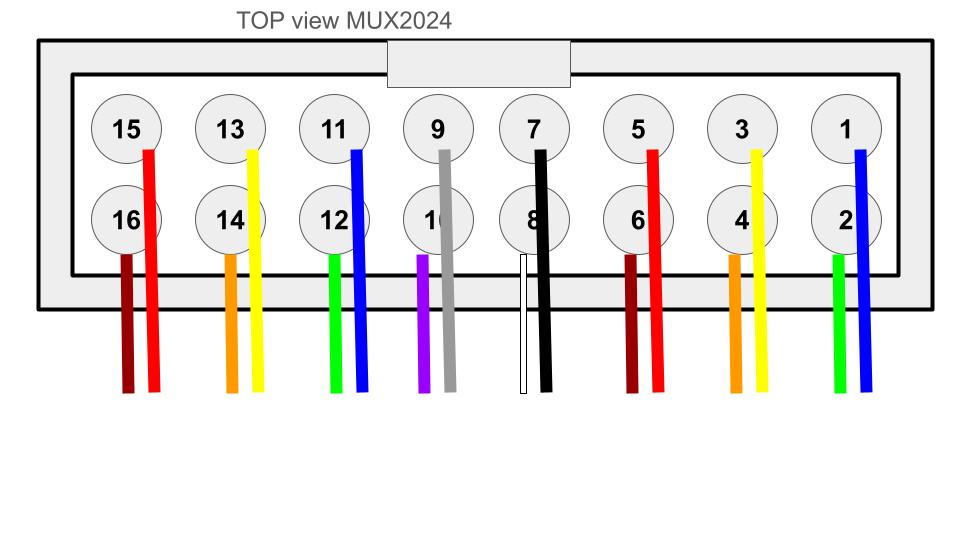
In MUX2024, the wiring of the electrodes from the IDC connector follows the order below (different from MUX2023). Take this into account if you wire your ribbon cable to further connectors or screw terminals.

Warning
At this point in the build, we consider that you have followed the instructions in Software installation section
Please connect both 12 V Battery for RX and TX.
For direct use of Raspberry Pi Connect Screen, mouse and keyboard, for remote control use SSH or VNC.
Now it is possible to carry out the first test on a reference circuit. See tests in Assembling the 64-electrode OhmPi for more details.